21 Best Practices for Creating Google Responsive Display Ads

Let’s face it, robots are going to take over the world.

With moves like those, it’s inevitable. So stop trying to fight it, and embrace all robots have to offer. Like sweet, sweet machine learning algorithms.

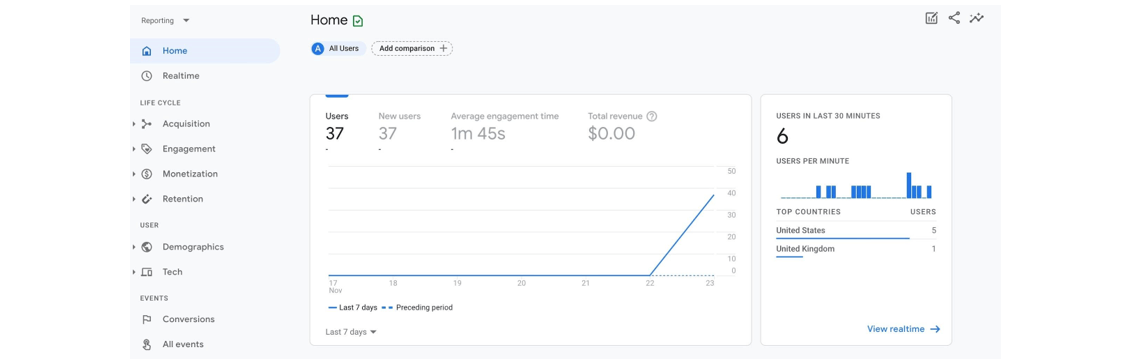
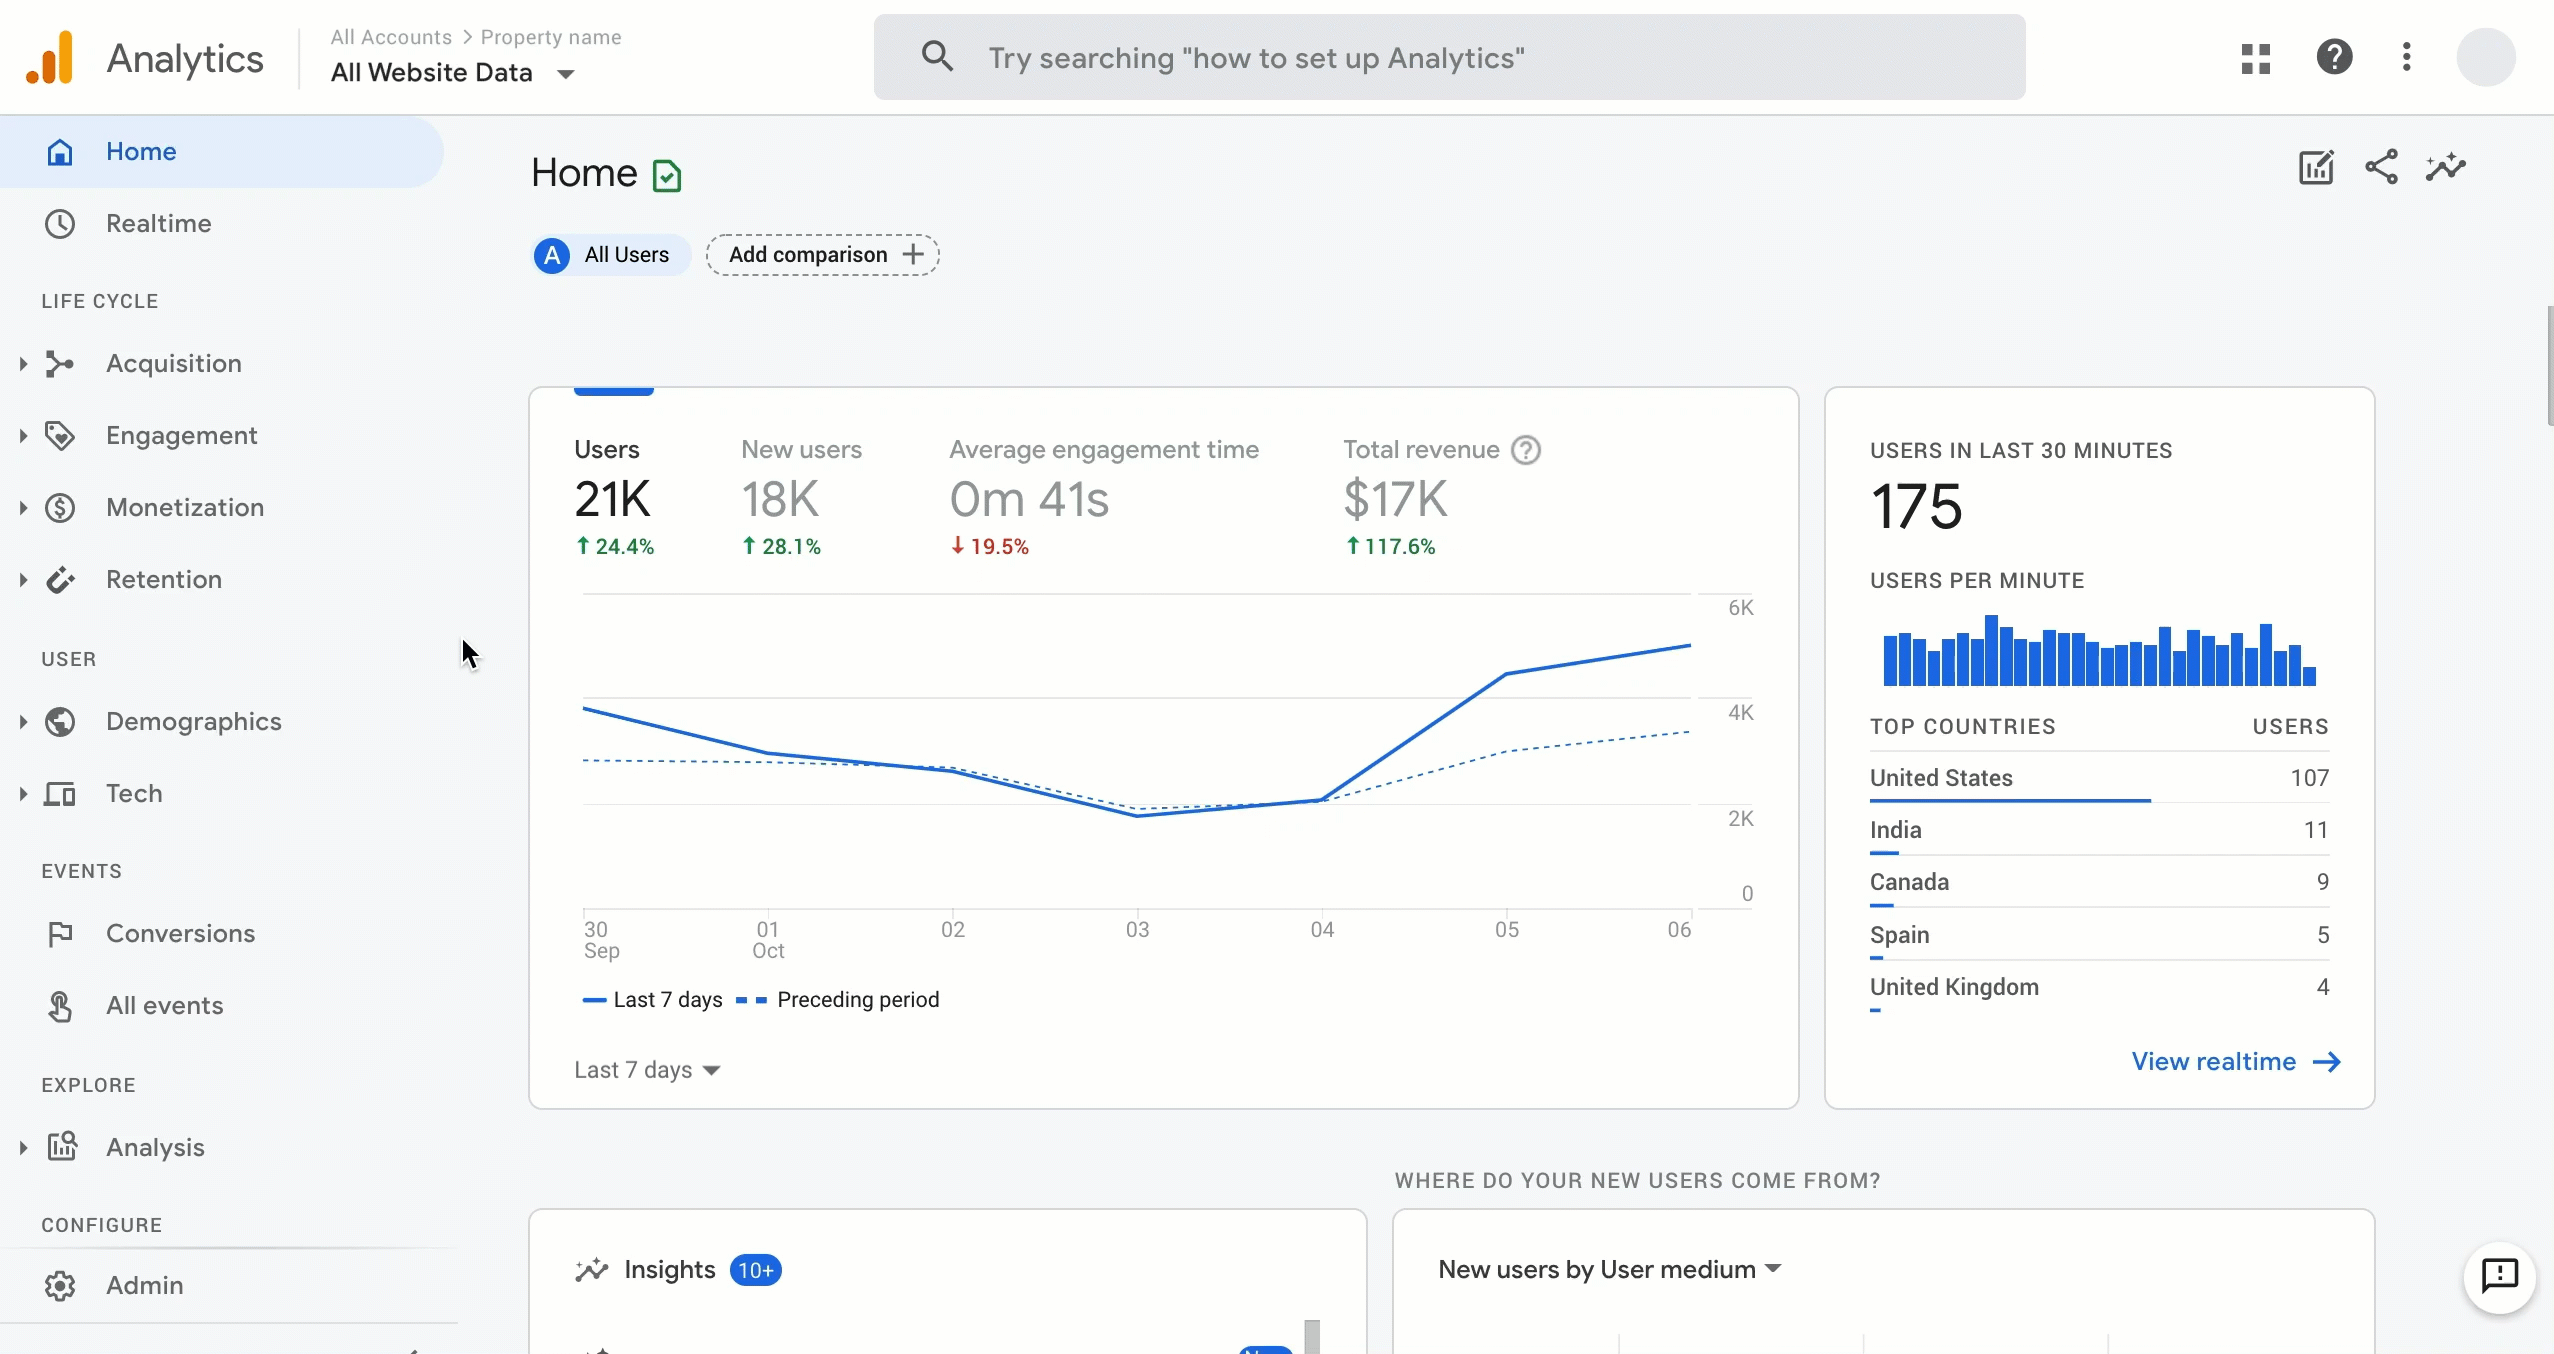
Case in point: Google’s Responsive Display Ads.

These display ads are automatically created by Google using its game-changing machine learning. We know what you’re thinking. But robots!

Don’t worry.

There is still use for you as a human. Because Google Display Ads work best when you (a human) provide its algorithms with the right kind of assets. Not to mention, provide strategy and management once the ads are up. Robots can do a lot, but they can’t do it all, after all.

Below we’re going to share 21 Responsive Display Ads best practices to ensure your assets have the right stuff, and the display ads Google’s robot AI creates for you perform at the best level possible.

What Exactly is a Google Responsive Display Ad?

Google Responsive Display Ads are ads created by Google automatically using assets that you provide. These assets include:

  • Long Headline
  • Short Headline
  • Description
  • Images (or video)
  • Your logo

Google then takes those individual assets, combines them into countless variations, and sends them out across the Google Display Network. Like this:

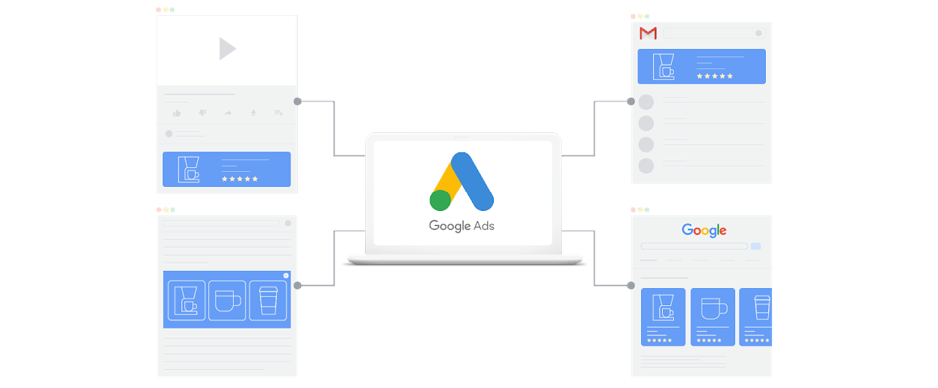
The Google Display Network is a group of over three million websites, news pages, and blogs, as well over 650,000 apps, where your ads can appear. By tapping into this network, you can reach people while they’re browsing their favorite websites, watching YouTube videos, checking their Gmail, or using an app.

Best of all, Google will automatically adjust the size, appearance, and format of your assets to fit the available ad space in each of these locations. Which is why they’re called “responsive.”

Avoid This Mistake When Creating Responsive Display Ads

With all this AI and robot talk, it’s easy to get complacent and think ‘I’ll just let the robots handle this.” And like we mentioned before, the use of AI is AMAZING…but it does not replace the need for human touch.

So while the end result created by Google can be amazing, it will only be as amazing as the assets you provide at the start.

So what’s the mistake to avoid?

Not doing your due diligence upfront, and failing to follow responsive display advertising best practices.

21 Best Practices for Google Display Ads

To ensure you don’t make the mistake we just mentioned above, here are some important Google Display Ads guidelines, shared by the pros from our PPC team, to follow. These will help ensure your assets work together in any and all configurations Google might conjure for your responsive display ads.

1. Adhere to Google’s Ad Policies

First and foremost, you need to make sure your ads comply with Google Ads Policies. Chances are you’re not going to read those. We get it. Disclaimers are super boring. So in a nutshell, don’t be gimmicky or deceptive and you’ll likely be okay.

2. Upload at Least 3-5 Images

Responsive display ads require a minimum of two images and allow up to 15 assets. While you should add as many assets as you can that work for your ad messaging, at the very least we recommend providing no less than 3-5 images.

3. Be Mindful of Aspect Ratios for Images

Google allows two aspect ratios for image assets.

  • 91:1 (landscape)
  • 1:1 (square)

One of your images MUST have an aspect ratio of 1.91:1. The rest can use either of the two.

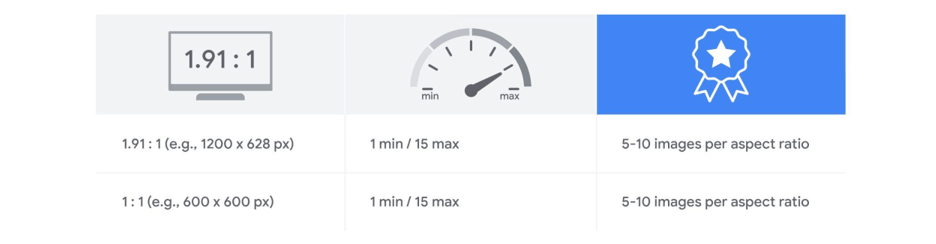
Please note that landscape images must have a minimum size of 600×314 and square images must have a minimum size of 300×300. After you upload your images, Google will resize them in order to fit particular ad sizes.

4. Be Mindful of Aspect Ratios for Logos

Google requires different aspect ratios for logos, than images. Logos must be sized to one of the following:

  • 4:1 (landscape)
  • 1:1 (square)

It is preferable to upload logos sized to each of those aspect ratios. However, if you can only upload a single version of your logo, prioritize a 1:1 logo.

Although landscape logos can have a minimum size of 512×128, and square logos a minimum size of 128×128, we recommend you upload logos sized either to 1200×300 (for landscape) or 1200×1200 (for square) to ensure they appear at the highest quality.

5. Upload Transparent Logos, If Possible

To give Google the most flexibility when automatically creating your display ads, and ensure they look as good as possible across all configurations, it is ideal if your logo is uploaded with a transparent background.

White backgrounds are also acceptable. Anything else (like colored backgrounds) should NOT be used.

6. Be Mindful of the Space Around Your Logo

The white space, or padding, around your logo should be 1/16th of the logo size. For those of who you hate math, this means that your logo shouldn’t abutt the edges of your image (like the examples in #4) but should be centered with some (not a lot) of white space surrounding it.

7. Use the Right File Type for Images and Logos

Make sure your image and logo assets are one of the following formats.

  • JPG
  • PNG
  • GIF (not animated)

That means no TIFFs, PDFs, SVGs, WebPs, animated GIFs, BMPs or any other combination of letters that you can imagine other than the three listed above.

8. Keep File Size Under 5mb

You cannot upload assets larger than 5mb. This hopefully shouldn’t be an issue with your logos and images (which should almost always be under 1mb), but if you’re uploading a video there is a chance it could be too large to be accepted.

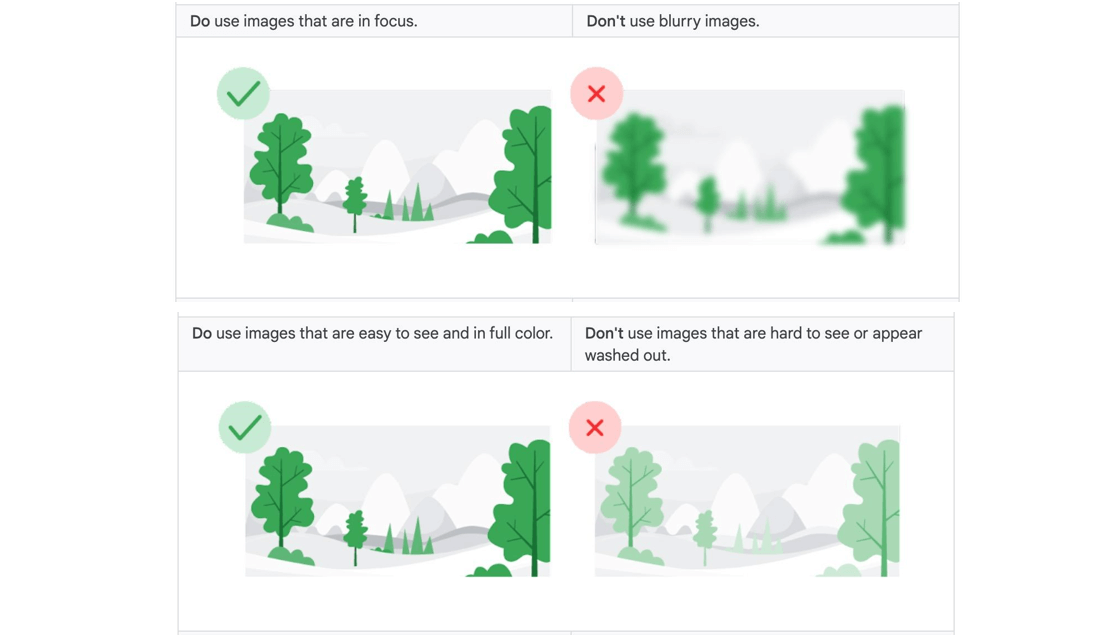
9. Don’t Use Blurry Images

Images are the most crucial element of responsive display ads. It is critical that they appear in the highest quality possible. The success of your ad depends on it. So make sure your images are as clear as possible.

This also means not using images that are full of color and easy to see. Not washed out, saturated, or using a low opacity.

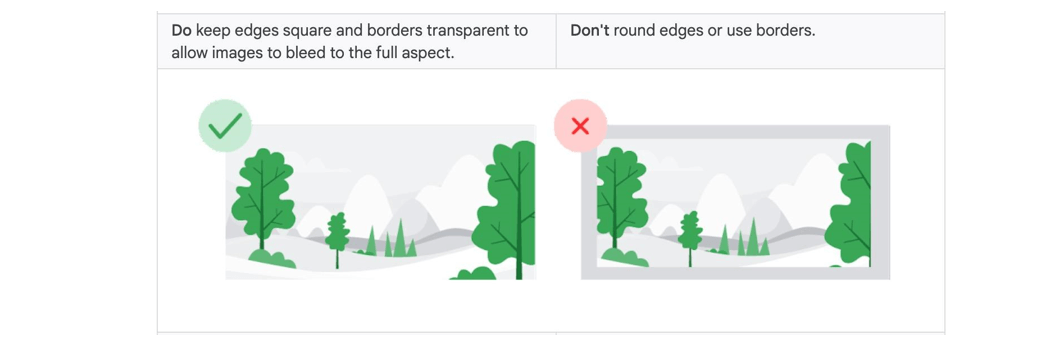
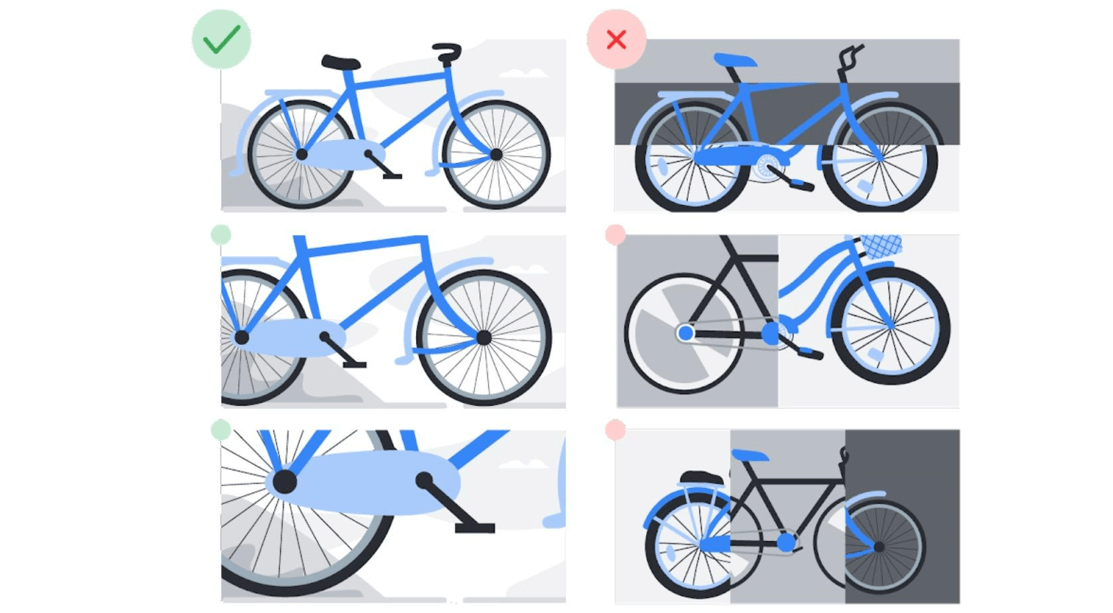
10. Avoid Images with Borders

Your images should appear at the very edge of the composition, and borders should be transparent and square (i.e. not rounded).

11. Avoid Using Filters

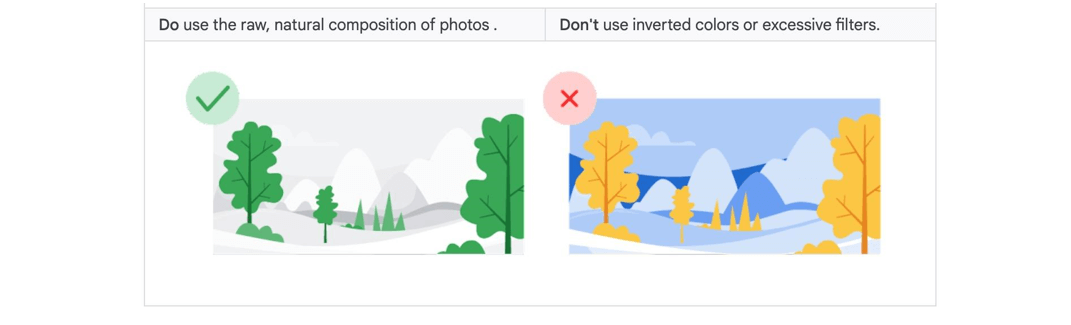
The image assets you use should be uploaded in their original color composition. Meaning you have not inverted their colors or used filters excessively to change the color tone.

12. Do Not Overlay Your Logo

Don’t overlay a logo on top of an image that you upload. This could cause repetition and visual confusion, as Google will in some ad layouts automatically overlay your logo asset over your separate image assets. If you have an image where the logo is organically integrated into the photograph, then you can use it. Just be aware your logo may appear multiple times in certain layouts.

13. Do Not Overlay Text

Avoid inserting text on top of an image. When assets are automatically combined by Google, layouts will vary so you don’t know exactly how that text will appear and your messaging can become repetitive when put alongside your headline and description. Text can also become unreadable in smaller ad sizes.

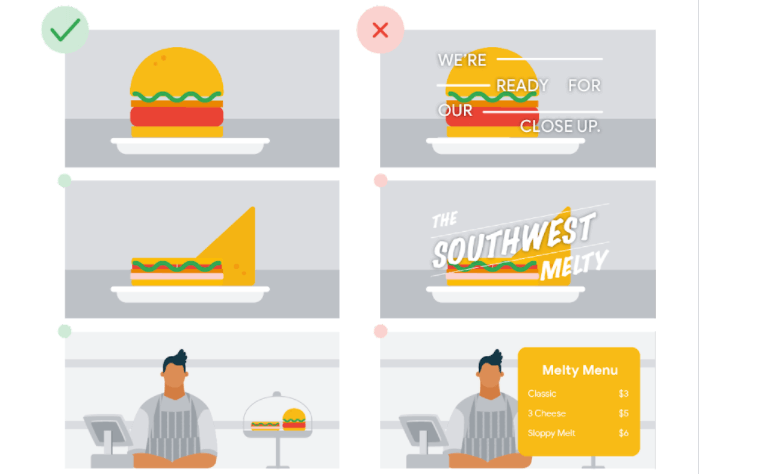
You can however use text that is naturally embedded or integrated in an image. But if you need to do so, we recommend that 20% or less of the display asset be text.

14. Do Not Overlay Buttons

Do not use button graphics within your images. Only use the original image.

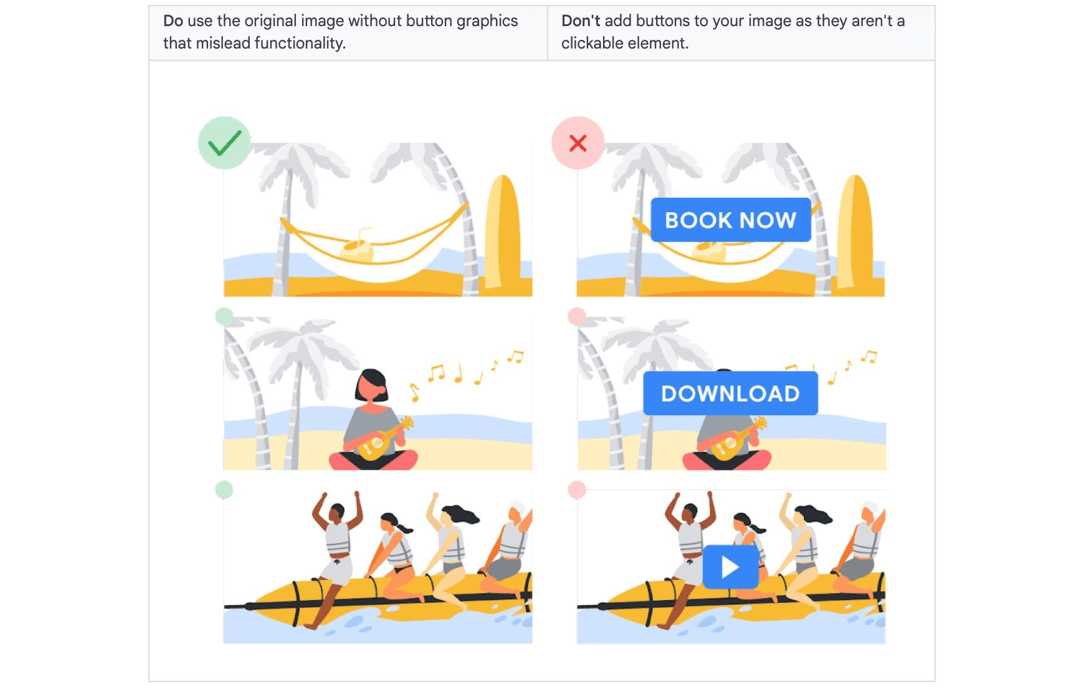
Remember those policies from above? Buttons that promise non-existent functionality are one of the deceptive practices that go against Google standards. Similarly, do NOT use text like “Play” or “Download” anywhere in the display ad.

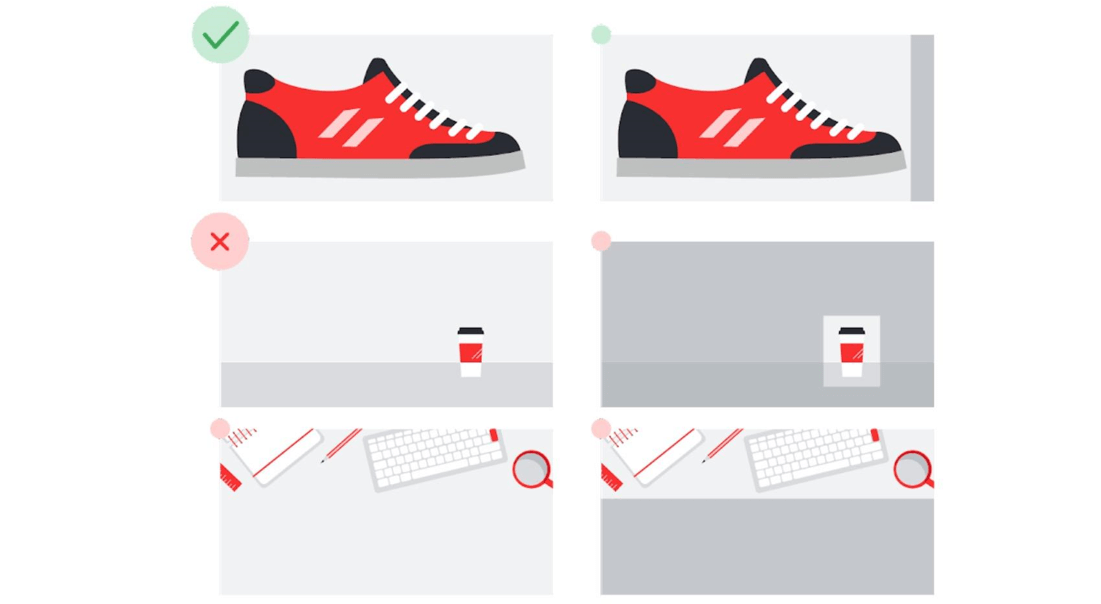
15. Focus Images Around Your Product and Services

The product or service you are promoting should be the main focus of your asset. As a rule of thumb, blank space should not take up more than 80% of the image.

16. Don’t Use Collages

Use a single image per asset. Meaning don’t upload a single asset that contains a collage of images (i.e. multiple images in the same composition).

17. Avoid Generic, Click-Bait Messaging

Your headlines and descriptions should use clear, compelling, simple text to describe your product, service or brand. Descriptions have an 80-character limit so it is important to convey a complete message concisely.

  • Bad Example
    • Headline: TitanBOT
    • Description: CLICK HERE to learn more!
  • Good Example
    • Headline: Get better SEO insight with TitanBOT
    • Description: Setup a free demo to find opportunities for your site today.

            Your text should use sentence case and avoid the use of ALL CAPS.

18. Include Prices, Promotions and Exclusives

Don’t make your ad mysterious. Provide as much useful information via your headlines and description as you can. Your audience is more likely to click your ad if they can make an immediate, informed decision about what you’re promoting. This includes inserting pricing info, promo codes, and using terms like “special offer,” “coupon”, and “discount” when relevant.

19. Ensure Your Landing Page Matches Your Ad Text

In addition to providing the assets listed above to Google, you’ll also need to share a landing page for the ad to point to. Your landing page’s copy and call-to-action need to match the text of your ad. If your ad text says “one day sale” then your landing page should be about that one-day sale. If your ad says “take a demo,” then your landing page should let users sign up for a demo.

20. Take Advantage of Auto-Generated Videos

Google responsive display ads come with an advanced format option to automatically generate videos using your assets. When selected, Google will create a video by combining your images, logo and text assets.

To create an auto-generated video you need to upload at least one log and either 3 landscape images, or 4 square images.

21. Set Up Dynamic Remarketing for Display Ads

Google makes it really easy to turn your responsive display ads into retargeting ads. All you need to do is attach a feed (i.e. database of your products and services) to your campaigns. Then let Google take care of the rest. Learn more about how to create a feed for responsive ads.


You + Google’s Display Algorithms = Perfect Match

Despite how efficiently Google can automatically generate countless, beautiful looking ads, there’s still a need for a human’s touch. Otherwise the assets you upload to Google won’t be up to snuff, and your responsive display ads will underperform.

The Google Display Network reaches over 90% of Internet users worldwide. Their responsive display ads are a great way to tap into that network. With a stat like that, it would be silly not to give display ads a try. Just make sure when you do, you follow the responsive display ads best practices listed above.

And buy your creative team something nice. Because you’re going to need their help. And once your ads are up, give us a call. And we’ll help you maximize your ad performance further. We’re all about working with robots.

How to Setup & Get the Most From the New Google Analytics 4

You know what sucks? Looking for data.

It’s just not fun.

We collect it. We use it. We analyze it. But no one really likes searching for it.

Don’t get us wrong. We looooovvve data. In all its magnificent metriciness. The sky’s the limit when you have the right data at your disposal. But it’d be so much cooler if the data we needed just magically appeared at the exact moment we needed it.

Our love of instant datafication is the whole reason why we built TitanBOT. So everyone can spend less time looking for SEO data and more time doing literally anything else. That, and because you know what’s even worse than looking for data?

Guessing data.

That’s just awful.

And stupid.

Pro Tip: Basing business decisions off wild guesses never works.

Using tools to prevent the need to guess data is a no brainer. Tools that also make it easier to find insightful data? Well, that’s what separates the winners from the losers.

Enter the new Google Analytics 4. What is Google’s Analytics 4 platform? And how can you get it set up? We’ve created this complete GA4 guide to help you get started.


What is Google Analytics 4?

Google Analytics 4 is the fourth version of Google’s wildly popular online data analysis tool. It’s referred to as GA4 (or G4). Because that’s how numbers work.

The search and data giant calls its newly updated platform the “next generation of Google Analytics.” The new GA4 is based on their “App + Web” property and is fundamentally different than the only “Universal” Analytics.” Mainly in the way that it tracks data, and they way that it displays data – with the advantage of being able to give metrics for users across a website, an app, or both at the same time. Read the announcement to learn more.

Unless you’re steeped in GA lore, you probably didn’t even know there were three previous versions of Google Analytics. These past version are:

  1. GA1 – known as Classic Google Analytics
  2. GA2 – known as Universal Google Analytics
  3. GA3 – also sometimes called Universal Google Analytics
  4. GA4 – catchy name TBD

GA’s purpose has remained the same across all versions — to track and report website traffic data like a champ. The difference between them is in how they track that data.

In other words, Google Analytics 4 tracks web data in an all-new way.

Here’s an intro from Google explaining how:

Here’s the CliffsNotes version of that video: Google Analytics 4 is a unified offering for user centric analytics across app and web for all clients.

You probably think that sounds like word vomit. And you’d be right.

A simpler explanation is that GA4 offers better, more insightful, easier to find analytics than its predecessors. Though you probably could have guessed that on your own. Version 4 of something is usually better than version 1. That’s how numbers work.

So the question isn’t really what is Google Analytics 4 — it’s an analytics tool, just like every other version of GA. Rather, we want to know in what novel ways does Google Analytics 4 do its tool thing.


How Google Analytics 4 Tracks Web Data

To understand how GA4 tracks data, let’s take a quick look back at its development history using everyone’s favorite way to digest data (other than Google Analytics):

BULLET POINTS!

  • A long, long time ago in the year 2019 people tracked digital engagement via two different methods:
  • In July 2019, Google released a beta “App + Web Property,” which combined tracking web and app engagement into a single tool.
  • In October 2020, beta testing finished and App + Web was renamed Google Analytics 4 and had a huge coming out party.
  • Enter you. Today. Reading about the new Google Analytics 4. About to add GA4 to your workflow.

It’s been a wild ride.

No longer known as “App + Web Property Beta,” GA4 has grown up to become the now de facto default for any new property created in Google Analytics, whether that property is a website, an app or — gasp — both.

In other words, GA4 is Google’s Analytics’ version of adulting.

GA4 brings to fruition several developing Google technologies and integrates them into a more well-rounded, wisened, and responsible data analysis service. Technologies such as:

  • Global Site Tag
  • Google Signals
  • Firebase Analytics

Streamlining these three into a single entity, and making it the default for all users, is how Google Analytics 4 tracks data differently than previous versions of GA.


How GA4 Tracks Data with Global Site Tag


Global Site Tag (also known as “gtag.js”) tracks new metrics without the need to update or add additional code.

In the past we used different tags to connect with different Google products. Global Site Tag combines these into a single, simplified dynamic tag that updates automatically. This means as Google adds new features and products, it will change the code for you.

For instance, GA4’s Enhanced Measurements lets you instantly track video and cross-domain engagement. Previously, you would have had to manually add additional tags yourself to do this.

As a result, GA4’s use of the Global Site Tag reduces the amount of time analysts spend finding data.


How GA4 Tracks Data with Google Signals

In case you haven’t heard, Google is phasing out cookies. And where Google goes, the online world follows. Google Signals is a move to embrace new privacy policies without limiting data analysis.

By automatically integrating with Google Signals, GA4 can ascertain incredibly accurate data by identifying users across multiple platforms (who haven’t disabled ad personalization), even if not logged in. It then uses a process called conversion modeling to analyze that subset of users and apply it to larger audiences.

In a world without cookies, Google Signals is how businesses gain accurate measurements, compare campaign performance, and successfully remarket.


How GA4 Tracks Data with Firebase Analytics

Unlike its predecessors, every single action on a website or app is defined in Google Analytics 4 as an “event’ (as opposed to a hit).

How Google Analytics 4 event tracking works

This measurement method adapts Firebase’s analytics model for mobile apps, where engagement is defined primarily by the things users do (Events), rather than what they see (PageViews). Overall, this method provides a more accurate picture of user experience.

In fact, shifting focus on user behavior is something Google is asserting across the board, as we’ve seen in their addition of Page Experience as a key SEO ranking factor.

Event-based tracking is probably the most noticeable change in GA4, and the one most likely to cause confusion. But once we get past the initial learning curve, we see this is actually a much more insightful way to analyze data.

Take an online purchase.

Previously, in order to log a purchase we had to rely on users loading a “Thank You” page, assign a set of dimensions and metrics that correlate to the transaction that brought the user to that page, and place a PageView tag on that page to pass the user’s transaction data along to our GA reports.

But in reality this is two separate events.

One event is the purchase itself. The other is the event of viewing the “Thank You” page. Google Analytics 4 lets us make this distinction. Previous versions did not.

Treating each action as its own event is a lot more precise. And the more precise your data, the better your insight and homed in your strategy will be. Not only do you not need to rely on a “Thank You” page to track a purchase, but your data relates to the thing it’s supposed to relate to.

Crazy, right?


How to Setup Google Analytics 4

Okay.

Enough chit chat.

Let’s see what this baby can do.

You’re probably in one of two positions right now. Either you already have a Google Analytics account and are wondering how to upgrade to GA4 and how doing so will affect your analytics strategy OR you want to add a new site to Google Analytics entirely.

Here’s how to set up the new Google Analytics 4 in both instances.


How to Setup GA4 for a New Site

The process is exactly the same as it used to be. Just follow Google’s recommended steps to get started with using Google Analytics 4.


How to Setup GA4 for an Existing Site

If you already have Google Analytics installed on your site, log into your account and head over to the Admin section (shown at right) to set up GA4.

You should then see an option to Upgrade to GA4.

Next click the “Get Started” blue button.

On the following screen request to “Create Property” which will finish the upgrade.

In some cases, as shown above, you will be unable to select the “enable data collection” box. This is because gtag.js has not been fully tagged on your site. No worries though, you can tag manually in the next part by selecting “Tag Installation.”

Selecting “Tag Installation” from the Setup Assistant is also how you connect your new GA4 property to your existing Analytics account.

Here you’ll find instructions on how to connect your properties using your existing on-page tag, either directly through Google Analytics (if you manually placed gtag.js on your site) or Google Tag Manager.

Just be sure to note your Measurement ID, and then follow the steps.

And with that your days of trying to find data are over.

Well, not entirely. You still have to do some work. But as we’ll see in a moment, the process is going to be a whole lot easier.


Event Tracking in Google Analytics 4

The new version of analytics is all about “events.” These events are the main way that data is shown in the new Google Analytics platform.

Whereas “event tracking” in previous versions meant setting up a modified Analytics code or gtag.js script, Google Analytics 4 claims to enable editing, tracking and fine-tuning of events within the UI. Now though, marketers can edit, correct and adjust how events are tracked in their analytics without having to editing on-site code.

There are many differences in data collection between Universal Analytics and Google Analytics 4 properties. The data you see in your Google Analytics 4 reports comes from what are called “events” that are triggered as users interact with your business’s website/app.

Here is a bit of an introduction to concepts in GA4:

  • Events: These are user interactions with a website or app – like page views, button clicks, user actions, etc. Unlike before, events do not require adding customized code into the on-site Analytics tracking code, some events are measured by default.
  • Parameters: Information that gives context to each event. For example, parameters can be used to describe the value of a purchase, or to provide context into where, how, and why the event was logged. These can include page titles, article IDs, etc. – these are most analogous to many of the “dimensions” that were available before.
  • User property: Attributes or demographic information about the user.
  • User ID: Used for cross-platform user tracking.


Do you need to do a lot of complex configuration and setup to track events in the new Google Analytics 4 property? No! As long as you use the SDK or gtag.js, you don’t need to write any additional code to collect certain default events.

Otherwise you can even create or modify events in via the GA4 user interface in order to get more advanced custom tracking.


How To Tell Which Google Analytics I Am Using

Learning new things is hard. It’s almost as painful as looking for data.

So you might be weary of swapping your existing, familiar Google Analytics setup for a new, untested one.

Luckily, right now you don’t have to.

When you set up a GA4 property, it actually creates an entirely new property, separate from your existing version of Google Analytics (aka Universal Analytics). So when you go to access your site’s property, you’ll now find two listings.

You can tell which is which based on their tracking IDs. The older version of Google Analytics (aka GA3 or Universal Analytics) has an ID that starts with “UA.” Google Analytics 4 properties do not. Whichever property is greyed and has a checkmark next to it is the one you’re currently using.

Though most likely after using the two you will be able to tell the difference based on their user-interfaces.

Universal Analytics (OLD)

Google Analytics 4 (NEW)

Google will likely eventually deprecate Universal Analytics and force everyone to solely use GA4, but for now you can access both. And it’s recommended you do so.

The old and new versions of Google Analytics provide different reports and data. By using both you can still rely on your existing analytics while getting familiar with the new insights provided by GA4.


Google Analytics Walkthrough and Highlights

To get familiarized with GA4’s new look check this walkthrough from Google.

Two areas worth highlighting further are:

Predictive Insights

GA4 uses machine learning to identify trends in your data and provide predictions about future user behavior. It will then automatically alert you about any significant trends that could help improve ROI. According to Google’s Vidhya Srinivasan its advantages come from it’s machine learning processes:

“It has machine learning at its core to automatically surface helpful insights and gives you a complete understanding of your customers across devices and platforms. It’s privacy-centric by design, so you can rely on Analytics even as industry changes like restrictions on cookies and identifiers create gaps in your data.”

The example Google uses is when GA4 “calculates churn probability so you can more efficiently invest in retaining customers at a time when marketing budgets are under pressure.”


Customer-Centric Data

One of GA4’s main goals is to provide marketers a more complete understanding of the user journey across devices. Via “life-cycle reporting,” it focuses less on individual metrics and instead hones in on the entire end-to-end buyer journey.

For example, with GA4 “you can see what channels are driving new customers in the user acquisition report, then use the engagement and retention reports to understand the actions these customers take, and whether they stick around, after converting.

In other worlds, in a world where omnichannel marketing rules, Google Analytics 4 is the best way to track marketing metrics.

Because it provides Omni Analytics.

Hey! Looks like we just found this version’s catchy name.


Why You Should Use the New Google Analytics 4

There are a lot of things to love about GA4. Even if you’re not a data nerd like us.

Like GA4’s integration with BigQuery, which one data analyst calls “the most significant release in the history of Google Analytics.” Or it’s improved integration with Google Ads. Or it’s simultaneously seamless tracking of users across mobile and desktop. Or its attempt to future proof against privacy protection laws (like GDPR and CCPA). Or it’s mission to supplant missing data due to cookie restrictions. Not to mention everything else we discussed above.

And best of all, GA4 decreases the amount of time you have to spend finding data.

Is Google Analytics 4 the answer to all your problems? Will it magically improve ROI and streamline your marketing? No. Marketers will still have to do some work, like analyzing that data and adjusting strategies accordingly. But it definitely makes doing business a little easier, and more intuitive.

Not to mention it ensures your success doesn’t depend on a guess.