Three Google Analytics Reports You Should Be Using Now

Google Analytics is a robust tool that helps to track activity and conversions on your website, plus it’s free! But with such a wide variety of reporting options, it’s easy to overlook (or even know about) some of the important ones. Whether you are an e-commerce or not e-commerce website, here are three reports that you should be using now!

Multi-Channel Funnel Reports 

What it is:

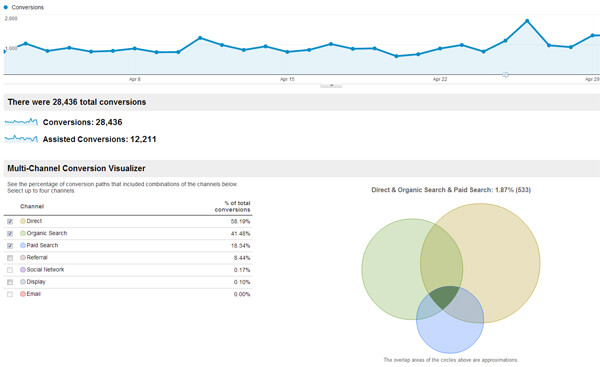
Multi-channel funnels is a great set of reports for webmasters who want to see where users are coming from and the channel path they take prior to a conversion on your website. You can find this set of reports under the Conversions section in Google Analytics; however, in order to see data in these reports, you must have first had goals or e-commerce tracking set up.

What you’ll see:

With multi-channel funnel reports, you are able to visualize which channels are resulting in direct conversions on your website. But what if a user originally came to your site by clicking an ad and came back a week later through organic search to complete a conversion? With the Assisted Conversions report, the original channel also gets an ‘assisted’ credit for any conversions within 30 days; so you can see which channels assist conversions as well as which channels provide the last interaction before a conversion.

With the Top Google Conversion Paths, Time Lag and Path Length reports, you’ll be able to visualize which path a user took to complete a conversion, how long it took them to complete in days and the number of channel interactions they had before converting. These reports are really useful in spotting trends that result in conversions and seeing which channels are helping to initiate or drive conversions.

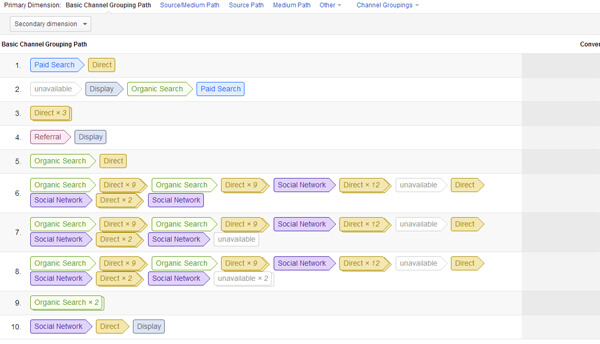
* Note: It is recommended to view your multi-channel funnel reports in an unfiltered profile to avoid skewed data.

Destination Goals with Conversion Funnels 

What it is:

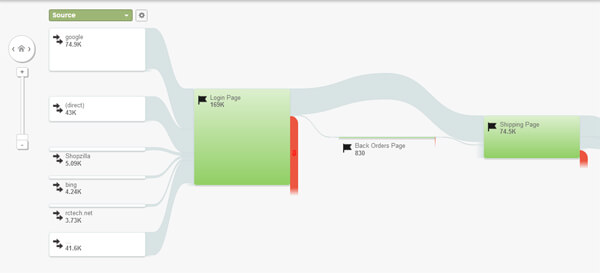
With multi-channel funnels, you are able to see which channels users take prior to entering your site and completing a conversion; with goal flow and goal funnels, you are able to see the conversion pathways users take once they are already on your website. In order to see data in the goal flow and goal funnel reports in Google Analytics, you’ll have to first create a URL destination goal with a destination funnel – which is a specified path you would anticipate users to take to complete a conversion on your site.

What you’ll see:

After you’ve created your URL destination goal with the funnel, you’ll be able to get data in the Goal Flow and Goal Funnel reports in the goals section under Conversions. What’s great about these reports is the ability to visualize how users are coming to your site and how they behave once they are on your website. With Goal Flow and Funnel Visualization, you can see whether a user completes the specified conversion path or if they drop off somewhere along the way. You can even dial down and click anywhere on the report to see more data about a particular page or path. This can help you determine which pages help to drive conversions, as well as identify which pages have possible issues.

Comparing dual metrics with advanced segments-

What it is:

When one metric just isn’t cutting it, you can compare multiple metrics against each other to get even more insight on your site’s performance. Just click advanced segments in the top left of any report to compare different metrics.
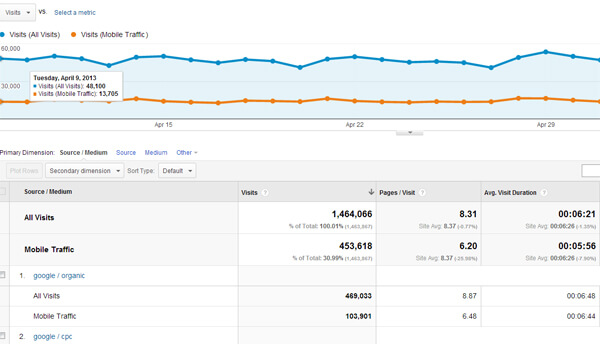
What you’ll see:

Say you’re on your All Traffic report and you want to compare all visits to visits that are coming from a mobile device. Under Advanced Segments, in the default segments section, choose all traffic and choose mobile traffic for a breakdown. You will see a visual comparison on the graph, as well as a further data breakdown of each metric below. With Advanced Segments, you can compare up to four metrics at any one time. Additionally, you can create your own custom segments by clicking + New Custom Segment. Note: The advanced segment filter will remain on until you manually deselect the metrics.

Not only do these reports provide both ecommerce and non-ecommerce websites with a wealth of data, but they are easy to implement and use. These are a few of our favorites and we hope you enjoy them too! If you have any questions about setting up or using any of these reports, as well as questions about Google Analytics in general, feel free to contact us!

Submitted by Erica Machin, Titan Growth

How Social Media Impacts Your Search Rankings

Social media may just give your SEO strategy the boost it needs. See how social media can impact your SEO rankings.

SEO and social media go hand-in-hand and there’s a good reason why. Social signals are factored into the ranking algorithm and can help to boost search engine rankings if you can leverage them correctly. Here are the main factors that Google considers when looking at your social media presence.

1. Local Check-ins

Why they matter: Check-ins are factored into the algorithm as a validation signal for your geographical location. Google figures that when users check-in to your location, they are checking into a legitimate and accurate location. Both Foursquare and Facebook offer check-ins, and if you are a local business Check-ins can be a good way to help boost local SEO.

How you can benefit: For businesses with a physical address, you can leverage social check-ins by first creating a Facebook business page and/or Foursquare account. If you already have a Facebook business account, you can enable check-ins by adding your business address and checking the box that says ‘show this map on your Page and enable check-ins.’ Promote check-ins with social media posts and incentives like discounts or special offers.

Enabling check-ins on Facebook

2. Facebook Shares, Twitter Tweets, and Google+ +1s

Why they matter: Shares, tweets, and +1s are all signals that indicate the quality of your content. When people share your content and web pages, especially authoritative individuals, it speaks to the quality and influence of your content. Currently, Google +1s are weighted more heavily, but all on-page shares and interactions can help build your authority online and shouldn’t be overlooked.

How you can benefit: If you have a blog or news site, adding share buttons to each article is essential to help promote sharing and build your content’s authority. Do the same for your website as well by adding share buttons to your homepage and internal pages where users can easily see and use them.

3. Facebook Fans, Twitter followers, and Google+ adds

Why they matter: Fans and followers signify your brands’ influence across the various social networks and also act as an authority signal. Brands with a significant amount of followers appear to be authoritative and influential. A significant social following coupled with interactions like shares, likes, and tweets can help create a boost in your search rankings.

How you can benefit: Quality content and engagement is a great way to elicit new followers. By providing something of value, through informational and relevant content, you increase your chances of obtaining more followers. Some of the networks, like Twitter and Facebook, offer advertising which can extend your brand’s reach and can also help to increase your social following. When growing your social following, the bottom line is to focus on obtaining quality fans, naturally.

4. Reviews

Why they matter: Reviews are great for local SEO, especially when they come from trusted and authoritative individuals. Reviews from review sites like Yelp and Google Places help to build your credibility online, and not just for the search engines, but for your users as well.

How you can benefit: First create accounts with Yelp, Google Places and any other review site that relate to your business. Ask happy customers for a review and include the Yelp or Google Places badge on your website and/or storefront to help promote more reviews.

A good social presence can really help give you a boost both with local search rankings and your rankings overall. If you would like more information on social media strategies or how you can leverage social media to your advantage, contact us.

Submitted by Erica Machin, Titan Growth

Getting Started With Google+ Local

Local listings like Google Plus Local can give businesses an advantage in local search. Here’s how you can get started.

Local listings can give a company a one-up in local search, and a Google Maps listing is a must for any company with an address. Besides the advantage of local search, local listings also help users better connect with and find your business.

While there are many advantages to creating a listing, Google’s current update with Google Places and Google+ Local creates a lot of confusion for those who are just trying to get started. Here’s how to navigate the update and create your business listing the easy way.

Disclaimer: This article assumes that you do not have a Google Places listing or a Google+ Business Page set up yet.

Getting started with Google+ Local

It’s important to remember that a Google+ Local account is not mandatory for creating a business listing on Google; however, by incorporating Google+ Local you offer your users more ways to connect with your business through reviews, photo tagging and further engagement with your brand. Also, by creating an account with Google+ Local first, you will avoid a 2-step verification, making the process much more seamless.

Step #1 Create a personal profile 

In order to create a local page for your brand, you must first have a personal Google+ profile. You can set one up here. Once you have a personal profile, you can create a local page by navigating to the ‘Pages’ section and clicking ‘Create a page.’

Step #2 Select the ‘Local Business’ category 

After selecting ‘create a page’ you will be prompted to identify what type of business page you would like to create. In order to create a Google Places listing through Google+ Local, you MUST choose ‘Local Business or Place’ as your business category. Once you have selected the local business category, you will be asked to enter a phone number. If you already have a Google Places listing, your listing will show up as an option to select, and you will eventually have to re-verify. If it doesn’t show up, select to ‘add your business to Google.’

Step #3 Complete your information 

Complete the rest of your information, agree to the terms of service and finalize your new page.  Once your page is created, you may add in additional information for a more complete profile, including a thumbnail image, a background image, a description and hours of operation. Make sure to fill out your profile to its entirety.

Step #4 Verify your page

In order for all of your information and edits to go live, you will first need to verify ownership of the page. Google does this to ensure that businesses are valid and have provided users with legitimate information. Click the blue ‘verify’ link under the about tab to verify your local business page. Google will send a small white postcard (Easy to overlook, so keep an eye out for it!) within 1-2 weeks containing a PIN that you will use to verify your business.

That’s it! Once you have verified your listing, and your information has gone through Google’s quality check, all of your changes will be live and users will be able to find your listing and Google+ Local page. You will be able to manage your listing through your Google+ account, and users will be able to review and engage with your company.

If you have any questions about setting up Google+ Local, Google Places or how these listings can impact your SEO strategy, please contact us.

Submitted by Erica Machin, Titan SEO