

Who doesn’t want recognition for their work? Most everyone does, right? Surprisingly, there are a number of bloggers who are still toiling away and have not implemented this simple tool that can have a big impact. So what is this tool, you ask? Well, if you’ve ever looked through the search engine results and noticed the writer’s images next to their article, then you already know what we’re talking about. It’s called Google’s ‘Authorship Markup’ and all it takes is a Google+ profile and a snippet of code. If you are a contributor and want to implement Google Authorship Markup, here’s how. for a blog or website, Authorship is a must! Not only can it help your visibility as an author, but can increase traffic to the website(s) you contribute to.
3 Reasons You Need to Implement Rel=Author Today
Ranking Visibility
There’s no doubt that establishing your authority and influence online is important and Authorship Markup allows you to do so. However, lately, there’s been speculation as to how important it really is in terms of Author Rank. After excerpts from “The New Digital Age”, an upcoming book by Google Executive Chairman Eric Schmidt, had been released there has been contention about Authorship Markup’s role in the algorithm.
“Within search results, information tied to verified online profiles will be ranked higher than content without such verification, which will result in most users naturally clicking on the top (verified) results. The true cost of remaining anonymous, then, might be the irrelevance.”
Despite the speculation (and perhaps slight overreaction), there isn’t any evidence that Google is currently or will ever use Author Rank to this extreme. Regardless – establishing your Authorship is nonetheless important. And that’s not to say there aren’t ranking perks, since Authorship Markup may contribute to your articles appearing higher in the search results for people who are logged into Google or have a Google+ profile. Plus, it’s much easier for searchers to identify you, and find your other work through Google+ when you have Authorship enabled.
Brand Recognition
If you’re a writer, naturally you want recognition for your work. With Google Authorship, you are able to associate your published content with your Google+ profile, allowing your name and image to show up in search results for your content pieces. Another perk is the “More” link, which features a link to more of your work, so searchers can easily find more of you. Since the Authorship tag is linked to your Google+ profile, it’s also a great way to continually build your community and following, which also has its own ranking benefit. Keep in mind that the more content you write, the more chances you have to show your face across the search engine results – and while you’re soaking up the limelight, the website you contribute to may be enjoying the increased click-through rate on your articles.
Click Through Rate
Since images are almost always more interesting than plain text, the Google Author rich snippets get a much higher click-through rate than regular articles without Google Author. Some companies have even reported click-through increases up to 150%! Look at the results below, and decide which one you would feel more compelled to click.
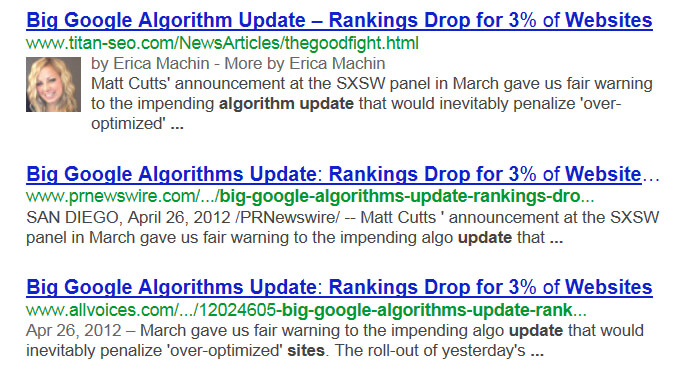
You’re more drawn to the result with the image, right? People are naturally inclined to choose the more visually appealing option. That’s also why it’s extremely important to have a good, clear headshot for your Google+ profile since that is what will be showing up in the search results. Just choosing the right picture can have a distinct effect, so choose wisely!
How To Establish Your Authorship on Google
If you are a contributor and want to implement Google Authorship Markup, here’s how. First, you’ll need a Google+ profile if you don’t already have one. Once you have a Google+ profile, you’ll need to link your Google+ profile to the content site by listing that you are a contributor for that site on your profile.
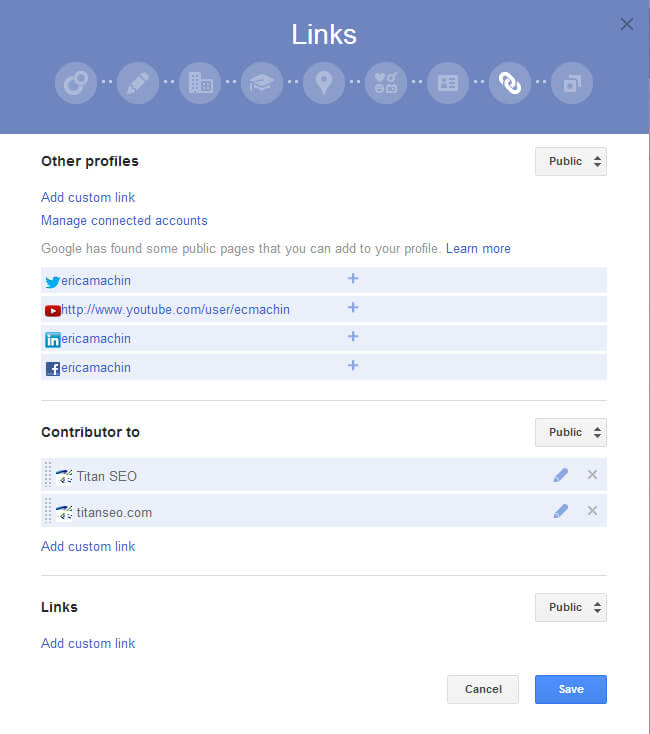
1. Linking Google+ to Your Content Website:
In the About section of your Google+ profile, find the links section and add the URL for the website(s) you contribute to.
2. Linking Your Content back to Google+:
Here’s where the rel=author tag comes into play. If you don’t have a signature or “about author” section for your blogs, now is the time to make one. Include this link near your Byline on each of your blog posts. The link text is Google+, so a good example would be ‘Connect with Erica on Google+’
Add this code snippet to each of your content pages.
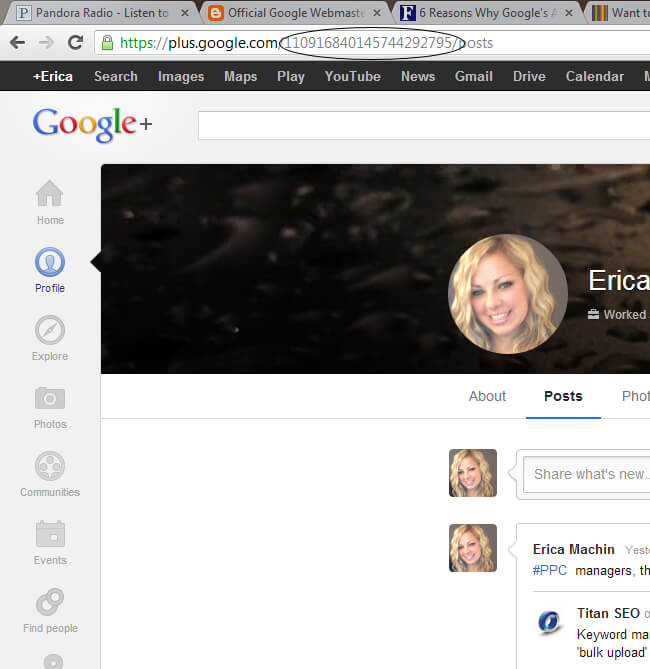
<a href=”https://plus.google.com/111111111111111111111?rel=author”>Google+</a>
Make sure to replace the 1’s with your personal Google+ profile ID, which you can find in the URL when you are on your own profile page. That’s it! Now, to ensure that your rel=author tags are working properly, you test them with Google’s Rich Snippet validator tool.
It could take some time to begin showing up in the search results, but be patient and eventually, you’ll begin to see your image when you search for your content pages. Keep in mind that while implementing Authorship Markup can help increase your visibility and click-through rates, the most important factor is creating awesome content that your audience will love. In the end, that’s what will really help you stand out.
Have questions about Google’s Authorship Markup or how to implement it? Contact Titan Growth, your local SEO agency and we’d be happy to help.
Submitted by Erica Machin, Titan Growth