Rev Up Your SEO with Rich Snippets: Examples of Google Rich Search Results

Want to rank higher in Google search results? With some well-written code, a skosh of schema, and a little Google magic, you can make all your SEO dreams come true by turning your regular old boring snippets into exciting rich snippets. Because who doesn’t want to get a little more rich?

For those already familiar with Rich Snippets and want to see how to add them to your site, skip ahead to:

  1. The Easiest Ways to Add Rich Snippets to Your Site
  2. How to Add Rich Snippets Manually
  3. How to Test and Preview Your Rich Snippets


For everyone else who’s new to rich snippets, or would like to learn more about their SEO benefits, read on.

What are Rich Snippets?

A rich snippet is a type of structured data markup that provides additional information within search results.

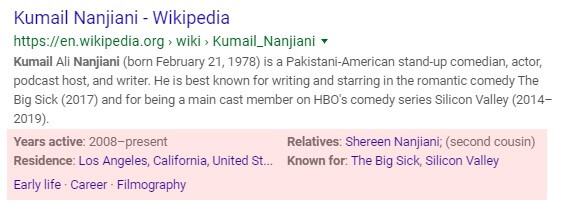
A traditional snippet in Google contains a title (in blue), URL (in green), and description (in grey). You’ve probably seen one or two of them before. They look like this:

Boooring. Where’s all the richness?

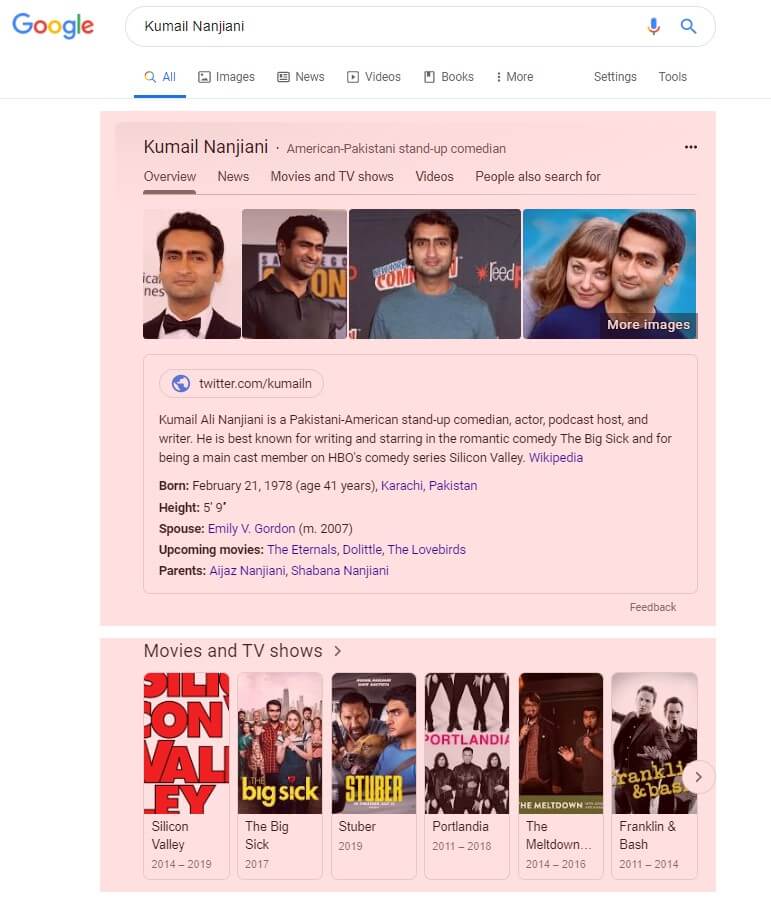
Now get a load of this…

Now that’s rich!

Take a moment to catch your breath.

Rich Snippet Examples

There are many types of rich snippets, some of which are industry-specific. Here are a few of the most popular:

  • Reviews
  • Ratings
  • Product Info
  • FAQ
  • Event Info
  • App Info
  • Course Info
  • Bread Crumbs
  • How-Tos


Normally search engines have a hard time understanding the price of a product or number of stars from a review. Using structured data, you can tell them all about this useful rich information and pave the way for Google to show it in search results.

But how much does that really help your site and its ability to rank? Let’s find out.

Do Rich Snippets Help SEO?

Rich snippets do not improve SEO, directly. Having structured data markup on a page will alone not increase its chances of ranking higher in search results. At least, that’s what Google says about structured data. However, rich snippets can indirectly help your SEO.

And that can be just as beneficial.

Let’s recap: Using schema markup is not a ranking factor. However, it can affect your SEO results. Confused? Who wouldn’t be? The key is Google loves when search results help people find what they want. And that’s exactly what rich snippets do.

On-page behavioral data like CTR, bounce rate, and time on site all have an impact on rankings. A Rich Snippet not only entices more people to click through to your page, but it also helps pre-qualify visitors to ensure they will find value while on your page.

So while rich snippets themselves may not be an official ranking signal, they have a huge potential for skyrocketing your SEO.

As a bonus, using the right method of implementation provides a direct benefit in improving SEO. To better understand what that means, let’s look at what’s going on behind-the-scenes of rich snippets, starting with structured data.

What is Structured Data?

As a general term, “structured data” refers to any data that is organized (i.e., structured) in a way that makes it easier to understand.

Structured data is used in a lot of ways. Facebook uses it for its Open Graph markup. Data analysts use it with SQL to build databases. When it comes to web development, structured data lets you talk to search engines in a way they understand using code.

For instance, we can use structured data to tell Google detailed information about our web pages, which they then share in amazing looking and engaging search results.

Rich snippets are a way for search engines to display structured data they find encoded on a web page. But it’s not the only way. You can browse Google’s Search Gallery to see all the nifty things you can do with structured data. (If you’re a SERP nerd like us, it’s like being a kid in a candy store.)

What is Schema.org?

To make search and web development more consistent across the Internet, the big search engines (Google, Bing, Yahoo! and Yandex) co-developed a structured data project. This collaboration resulted in Schema.org.

At face value, Schema.org is a website that documents the schemas (i.e., concepts for implementing structured data) via a collection of code. It provides a place where developers and digital marketers can find all the structured data markup needed to “talk” with search engines.

At its heart, Schema.org is a collaborative community to “create, maintain, and promote schemas for structured data on the Internet, in email messages, and beyond.”

Explore Schema.org for all the possibilities in displaying your page’s info on SERPs. Find the code you want. Copy it, and adapt it to your needs, preferably using JSON-LD.

What is JSON-LD?

JSON-LD stands for JavacScript Object Notation for Linked Data. It is a way to write code that utilizes multi-dimensional arrays to encode structured data using JSON (i.e., a means for storing and transporting data). Google recommends using JSON-LD, because it is great for your SEO.

There are several syntaxes (or implementation methods) that can communicate structured data to search engines. These syntaxes include:

  • JSON-LD
  • Microdata
  • Microformats
  • RDFa

These syntaxes are different languages that servers and web applications use to talk to another, with Schema.org providing the vocabulary. The necessary vocabulary for Microdata, RDFa, or JSON-LD is found on Schema.org. (Microformats use a site called Microformats.org.) But of all these syntaxes, JSON-LD is the simplest to implement, and most effective when it comes to SEO, which is why Google loves it.

Why is JSON-LD Great for Improving SEO?

JSON-LD provides easily indexable content to search crawlers, which creates a better web page in the eyes of both Google and humans. This occurs because you can add markup as is to a page’s HTML using JSON-LD (which you cannot do using the other syntaxes).

Streamlining how data is transmitted from your web pages to search results boosts ranking potential. That’s why SEO tools like Yoast SEO also recommend always using JSON-LD. In fact, if you use the Yoast plugin on your WordPress site, it automatically adds some useful structured data via JSON-LD to your site. So there’s a good chance you’re already using structured data and didn’t even know it.

So if you use JSON-LD to create rich snippets, you’re doing your SEO a huge favor.

The Difference Between Rich Snippets, Rich Cards, and Featured Snippets

Understandably, many people get rich snippets confused with rich cards and featured snippets. While they can all be considered “rich results,” each is technically its own separate thing.

As we know, a rich snippet is an enhanced organic search result. It is a modification made to an existing result.

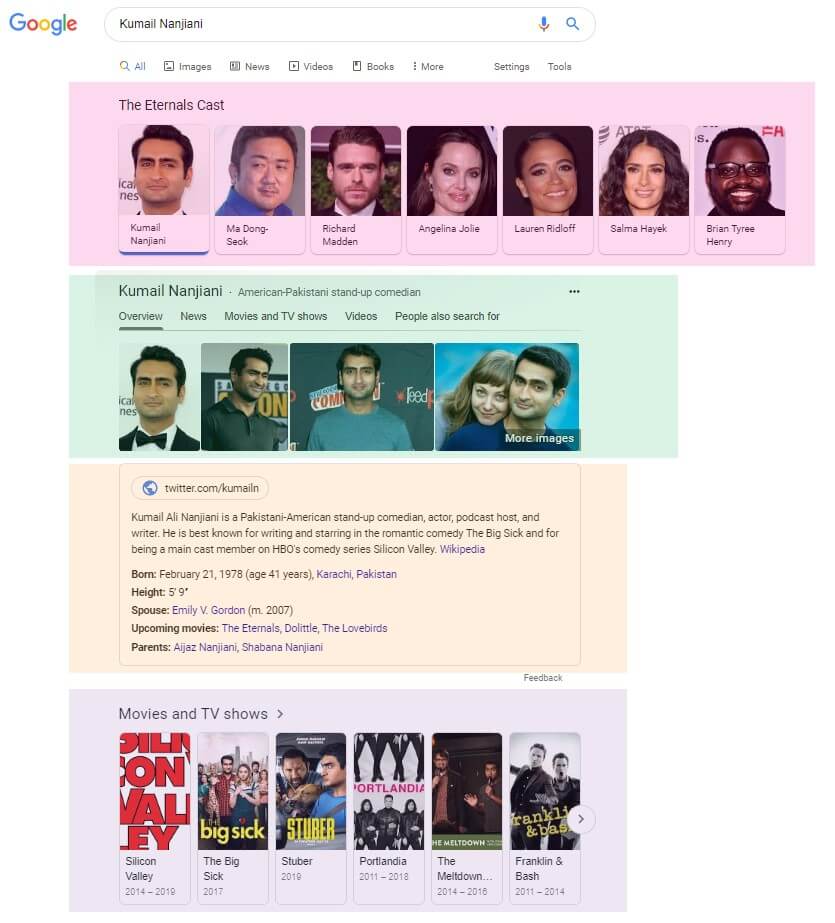
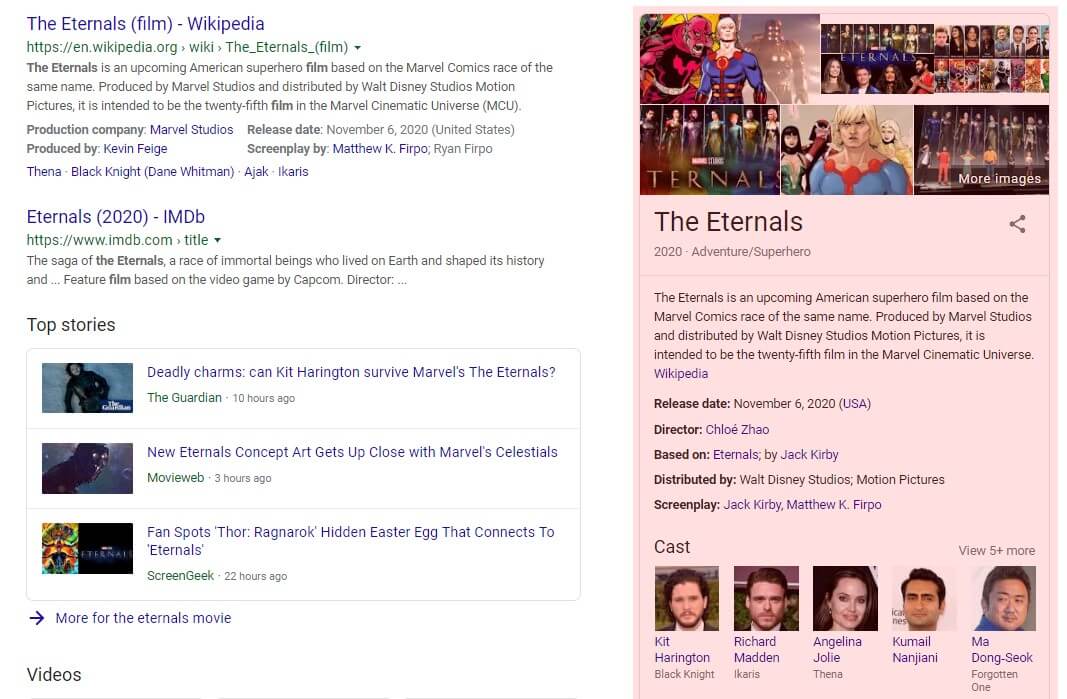
Rich cards are an entirely separate result that appears at the top of all other search results. If you’ve ever searched for the best movies of all-time and saw a carousel of movie posters at the top of the page, you’re looking at movie rich cards. Rich cards can also come in the flavor of recipes, articles, events, or in the example below, actor bios and movie projects.

A Featured Snippet is a box that appears above all other results in the coveted “position zero.” It is a prominent block of content hand-picked by Google’s algorithm as the best answer to a user’s question or search. While rich snippets and rich cards both use schema markup, featured snippets do not. There’s no trick to becoming a featured snippet other than adhering to SEO best practices.

Then there’s the Knowledge Graph, which appears as a large block of content to the right of search results. Much of the content in a Knowledge Graph comes from user-applied structured data, but Google My Business accounts can strongly influence it.

The Easiest Ways to Add Rich Snippets to Your Site

If you’re not a pro developer, don’t be intimidated by the technical aspects of structured data. Adding rich snippet markup to your site can be done by everyone. To make things as easy as possible, Google has a very helpful online Rich Snippets reference doc.

One of the best and easiest ways to add markup is using schema generators that can help you manually generate the code you need for any rich snippet. Our favorites include:


These online tools take much of the guesswork out of using structured data. Data Highlighter, in particular, was made for non-code savvy individuals. It lets you highlight sections of a web page that you want to apply to Rich Snippets. It doesn’t get much easier than that! To help even further, we’ve written a guide on how to set up schema using Google Data Markup Helper and Data Highlighter.

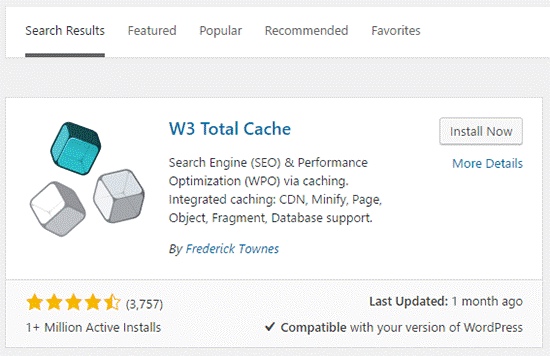
If you’re using WordPress, plugins can practically automate the entire process of adding rich snippet markup for you. Some popular ones include:


However, there is a downside to using plugins. Since we’re dealing with scripts, these third-party plugins can conflict with your theme or other plugins, and add extra HTTP requests to your page, which is bad for site speed. (Learn more about the importance of reducing HTTP requests.)

Of course, for the best results, we recommend working with an experienced SEO specialist when implementing structured data. This removes all the stress of dealing with foreign code and ensures it is implemented correctly on your site. Working with an SEO specialist also gives your web page the best chance for appearing as a rich snippet.

How to Add Rich Snippets Manually

There are a few ways to gather the resources needed to create rich snippet markup. Professional developers typically use Schema.org to create JSON-LD code from scratch. But if that sounds too complicated and you want to add structured data manually, here’s an alternate DIY method to do so:

  1. Visit the Google Search Gallery
  2. Identify and select your desired rich result and hit “Get Started”
  3. Scroll down to the “Structured data type definitions” and pick out the properties you want to be displayed. (They must also be found on your web page.)
  4. Use Google’s Structured Data Markup Helper to generate your JSON-LD code
  5. Copy and paste the <script> onto your web page

Google recommends adding the JSON-LD script to the <head> section of your page’s HTML, although it is okay to add it within the <body> section.

How to Test and Preview Your Rich Snippets

Once you’ve added Rich Snippet markup to your web page, test your success. Here are two tools released by Google to do just that:

To use them, either paste your <script> or paste the URL of your page. If you go with the latter, be sure the page has been published and updated with your markup.

Don’t forget to hit the “preview” button in those Rich Snippet tests. It’s a really cool feature that shows how your rich snippet will appear in search results.

How Long Does it Take for Rich Snippets to Appear?

Generally, it can take anywhere from 2-12 weeks for a Rich Snippet to appear on Google. In some special cases, we have seen it appear within a few days. But there is no guarantee. Google may decide not to display your page as a rich snippet at all. In those cases, more than likely Google didn’t think the structured data would be of value to searchers.

Patience here is key. If you recently added schema markup and didn’t see Rich Snippets right away, refrain from making any modifications to make them appear faster. Google takes its time analyzing what you’ve done. Any tinkering could reset the whole process and it’ll take even longer. As long as you passed the tests above, wait at least two months before making modifications. If nothing happens after that time, then take another look at your schema markup. (Or consult an SEO specialist for help.)

Go Forth and Get SEO Rich With Snippets

Look, we’re all just trying to get ahead. (Or in the case of JSON-LD, get in the <head>. Ba-Dum-CH! We’ll be here all night.) Every site just wants to catch its big break and edge out the competition. That’s why it is so important to take advantage of every opportunity that comes your way.

Rich snippets are one such opportunity and a big one at that. So embrace structured data and use it to let the world know how great you are.

7 Effective Ways to Improve Page Load Speed Right Now

Faster loading pages. Boosting your site’s performance. Increasing Google PageSpeed Insights and GTmetrix scores. Ranking better in search results. All these and more can be yours after reading our seven foolproof SEO methods to improve page load speed.

Have you ever heard the fable of the tortoise and the hare? You know, the one where the slow and steady turtle wins a race over the arrogant, speedy rabbit. Well, it’s a lie. Going slow never got anyone anywhere fast. That’s just common sense, and good business.

Okay, you got us. Maybe a few things can benefit from taking it slow, like eating, aging, and walking down steep stairs while carrying swords. But when it comes to SEO, there is nothing worse than sluggishness.

So buckle up, because it’s going to be a high-speed ride to higher rankings.

Why is Having a Fast Website Important?

Would you rather wait for more than two days for your packages, snail mail a letter instead of sending a text, or twiddle your thumbs waiting for a website to load? Of course not. Who has time for that? Certainly not Google and all the other search engines out there, not to mention your visitors.

We live in a world of instant gratification, and just a one-second delay in page response can lead to:


  • 7% drop in conversions
  • 11% fewer page views
  • 16% decrease in customer satisfaction


And with every increased second those numbers become more terrifying:


  • Bounce rates increase by a whopping 103% after only a 2-second delay
  • 40% will abandon a site taking longer than 3 seconds to load
  • 79% of dissatisfied shoppers with site speed are less likely to buy again
  • 44% will tell their friends about the bad experience

If you like keeping yourself up at night worrying about customer satisfaction, here’s a complete picture of the impact slow site speeds can have:

Scary, right?

So how well does your website stack up? Let’s find out.

How Can I View My Web Page Load Time?

There are several online benchmarking tools that measure how fast your web pages load. They will also show how large and resource-heavy your site is and provide suggestions for improvement. Best of all, they are free to use.

They include:


  • Google PageSpeed Insights – runs separate tests for mobile and desktop, segregating load time into different stages.
  • GTmetrix – provides an overview of page load time, size, and resource allocation, along with YSlow.
  • Pingdom – similar service to GTmetrix.
  • WebPageTest – less user-friendly than the others but no less insightful. Of note are its advanced options, which take into account how a site performs in different browsers.
  • Think with Google Mobile Tester – a mobile-specific version of PageSpeed Insights. It includes added insights, like competitor comparisons and conversion rate impacts.


When running these tests, be sure to select test locations that are closest to where your audience is physically located, which will give the most pertinent results.

Now that you know how fast your pages are loading let’s see whether you’re clocking in a good time or not.

How Fast Should My Website Load?

As a rule of thumb, your web pages should fully load in 3 seconds or less, with average pages starting to load between 1 and 2.5 seconds.

If your site speed is between 3-5 seconds, it’s not the end of the world, but your pages are performing less than desired by today’s mobile-first standards. Anything over 5 seconds is considered poor. But no matter how fast your site is performing, it could always use a Vitamin B boost – figuratively speaking of course. (Please don’t try and stuff vitamins into your USB ports.)

You should also pay close attention to your page’s Time of First Byte, or TTFB. (PageSpeed Insights and WebPageTest show this data.) TTFB is the amount of time browsers wait before receiving the first byte of data from a server. Google recommends a TTFB of 200ms or less.

Here’s more insight into load time goals:


But how do you improve your page load time to achieve this ideal of 3 seconds or under?

We’ve got you covered.

What’s the Best Way to Improve Page Load Time?

A lot of factors influence page load time. So like everything in SEO, tackling them is a process. Some methods can be done right away and have an immediate impact. Others will take time and testing to reap the benefits.

Here’s a highlight reel of the best methods:


  1. Enable Gzip Compression
  2. Optimize Images
  3. Enable Browser Caching
  4. Minify HTML, CSS and JavaScript
  5. Reduce HTTP Requests
  6. Reduce Server Response Time
  7. Consider Implementing a CDN


Bonus: WordPress Specific Improvements

On your mark, get set, boost!

1. Enable Gzip Compression

Compression shrinks the size of your web page files allowing for faster downloading. It’s one of the easiest and quickest ways to improve page load time. Using Gzip for compression is the standard, although Brotli is another well-known method. When enabled, Gzip can reduce the size of HTML, CSS, and JavaScript by as much as 70%. (Run a Gzip test to see if you have it enabled.)

Most WordPress all-in-one performance plugins have the option to enable compression automatically. For those more hands-on or using a different CMS, you can also enable compression manually by adding some code to your .htaccess file.

2. Optimize Images

Some of the most common culprits contributing to large page size are images. As a rule of thumb, your images should be optimized and properly sized according to the following:

  • Under 100kb
  • Set to the exact size they will be shown
  • Saved as JPG (unless transparent, in which case use PNG)

With image compression comes a loss in quality, so don’t let your need for speed ruin the quality of your site’s aesthetic. But at the very least, if your site has a width of 600px, don’t upload a photo that is 2500px wide.

Optimize images before uploading them using photo editing software like Photoshop (paid) or GIMP (free). For added compression, you can also use an online optimizer like TinyJPG. As a secondary option, if using a CMS like WordPress, both Smush.it and EWWW Image Optimizer are good supplemental plugins. Some plugins also allow you to enable a Lazy Load feature that prioritizes above-the-fold content and only loads your images when a user scrolls by them — drastically reducing requests placed on your server.

3. Enable Browser Caching

Every time a visitor returns to your site, their browser re-downloads files such as images, scripts, and stylesheets. That is unless you have enabled browser caching.

With browser caching, static files are stored on your visitor’s browser. So the next time they visit your site, there’s no need to download anything again, and everything loads much faster.

If you’re using WordPress, caching is very easy. Plugins like W3 Total Cache and WP Rocket can walk you through all the necessary steps and practically set it up for you. Just be sure to use only one of these plugins at a time. Enabling caching manually is a little more involved.

4. Minify HTML, CSS and JavaScript

Minification removes unnecessary or redundant code without affecting performance. This includes removing code comments, spacing, lengthy function names, and so on. All things which are invisible to the user, but weigh down your load time.

WordPress plugins like WP Rocket, WP-Minify, or W3 Total Cache are an ideal way for novice web developers to achieve minification. For other CMS and advanced admins, you will need to perform manual minification. Some tools that can help include:


5. Reduce HTTP Requests

This is a big one. And it can get complicated. But don’t let it scare you. Reducing page requests is the holy grail of page load optimization. (You should strive to keep the number of HTTP requests under 50.)

There are a lot of methods to streamlining these requests, as well as speeding them up. So many, in fact, that we created a special “Reduce HTTP requests like a boss” tutorial.

6. Reduce Server Response Time

Changing servers is not something you should do lightly or on the fly. But your hosting server plays a key role in load time, so understanding whether you have the best setup goes a long way.

Above all else, check with your provider to make sure your servers experience sufficient uptimes, provide enough bandwidth, and are located near your target audience. If not, then it might be time to consider switching to a different hosting service.

Some other key things to consider:

PHP Version

If your site is PHP-based, you’ll want to use PHP 7 or higher. The easiest way to learn which PHP you’re currently using and upgrade if needed is to call your hosting provider. Though please note, changes in PHP can conflict with some WordPress themes and plugins. Luckily, you can easily reverse your server’s PHP if anything seems amiss.

HTTP/2

HTTP/2 is a server-side protocol that vastly improves site speed and efficiency. Not all sites use HTTP/2 when they could. To check if your server supports HTTP/2 use this online tool. Then contact your hosting provider to review your options.

Hosting Type

Most small businesses use less expensive shared hosting servers (like BlueHost, GoDaddy, and HostGator). Larger businesses that see lots of site traffic typically require more robust virtual private servers (VPS) or direct servers to deliver their content. Decide which category you fall under based on budget and performance.

7. Consider Implementing a CDN

Content Delivery Networks (CDNs) are great for web pages serving diverse international locations or who are looking for an added speed boost to their regular hosting service. These third-party, paid services not only offer HTTP/2 support but vastly reduce request times by hosting your files across a large network of global servers.

Some notable CDN options include:


Not every site needs a CDN (despite what GTmetrix might tell you), so we recommend implementing the other methods on this list first. If afterward, your page load times are still lagging, then consider a CDN as a viable option.

Bonus: WordPress Specific Improvements

If you’re using WordPress, several other factors could be contributing to your page load time. You’ll want to address each of these along with the other methods listed above.

Reduce Plugins

Plugins are awesome and can do a lot to improve the speed of your site. (As we’ve seen above.) But the wrong plugins can have the complete opposite effect. Having too many plugins installed can cause issues, slowing down your site’s performance drastically.

That’s why it is important to:


  • Routinely maintain and update your plugins
  • Routinely remove any unused or unnecessary plugins
  • See if there are faster or lighter alternatives
  • Identify plugins whose functionality overlaps
  • Eliminate plugins for tasks you can do manually


For example, if you have a Google Analytics plugin installed, you’d be better off manually adding the snippet, using Google Tag Manager, or using the Insert Headers and Footers plugin (which is smaller in size).

To help locate problem areas, there’s a wonderful plugin assessment tool called Page Performance Profiler that can tell which plugins are hurting page load. (Don’t forget to remove it once you’re done.)

Clean Your Database

Over time WordPress databases can get cluttered with saved drafts, post revisions, and other stuff you don’t need. Occasionally cleaning this mess can help speed your site up. Some all-in-one performance plugins come with this capability (like WP Rocket), or you can use the WP Optimize plugin.

Update CMS and Theme

Make sure you’re always using the latest versions of both your theme and WordPress install. (Don’t forget to backup your site before doing so.) If, after updating and making all the changes above your site is still sluggish, you may want to consider trying a new theme altogether. While themes make your site look great, they can bring a lot of baggage with them that slows down your site. Find a theme that works best for you.

Page Load Time Is More Important Than Ever

In case you haven’t heard, Google completely mobile-focused these days. And it’s not about to back off anytime soon. Which is why it is so important that your pages load as quickly as possible.

Let’s face it. We all have short attention spans, and they’re growing shorter by the second. If your page doesn’t load fast enough, there are plenty of cat videos out there that will. So what are you waiting for? Time is of the essence. Start implementing these page speed & page experience improvements today. Because SERPS (just like cats) wait for no one.

Reduce Budget Waste: 7 Audiences to Exclude From Your Google Ads Campaigns Today

Word to the wise: Less is more. Especially when it comes to your paid media ad campaigns. Just ask negative audiences. Being less is basically their thing, and it’s what makes them one of the most powerful targeting tools around. But are you using negative audiences in paid media as well as you could?

Let’s find out.

Paid media advertising is all about relevancy. The more relevant your messaging, the more likely your ads will get clicked. The more relevant your keywords, the more likely your ads will appear where they should. The more relevant your audience targeting, the more likely your ads will find the right people. Anything you can do to refine your messaging, hone your keywords, exclude negative audiences and focus your targeting will pay off big time.

When it comes to audience targeting, this means that for every group of people you want to target, there’s a whole lot more that you don’t, which is exactly why every ad campaign should include negative audiences in some form or another. If your campaign doesn’t, then your ads are just wasting money.

So make every click count with more relevant audience targeting. To help, here are seven audiences that should be excluded from your paid media campaigns today:

  1. Current Customers (or Everyone Else)
  2. Current Employees
  3. Job Seekers
  4. App Audiences
  5. Non-Engaged Visitors
  6. Overlapping Audiences
  7. Convertors

Before exploring this list of audience exclusions further, let’s breakdown how negative audiences are defined and the different ways to implement them effectively. After all, a little negativity can be a good thing.

What is a Negative Audience?

Negative audiences are groups of people you want to exclude from being targeted by your advertising campaigns. They eliminate individuals who are not a good match for your ads. Whereas reaching specific target audiences with your ads is important, it is just as vital to exclude unrelated, unprofitable audiences.

We’ll cover how to set up negative audiences using Google Ads and Facebook Ads, but you can similarly exclude audiences on almost every ad platform, including LinkedIn.

Why is Using Negative Audiences Important?

Building audiences is an important part of a good paid media strategy and typically involves adding any people whose interests, behaviors, and past interactions indicate they are most likely to engage with your ads and convert on your landing pages. However, only building out these audiences and not focusing on excluding those that won’t convert usually casts too wide of a net.

Targeting too many people can result in wasted clicks and budget, high cost-per-click (CPC), and high cost-per-acquisition (CPA).

Properly incorporating a negative audience into your targeting refines your paid media campaigns, so they reach only the audiences that are most relevant to your business and ads. Thus, reducing costs and increasing the likelihood of attracting quality engagement, clicks, and conversions.

How to Exclude Audiences in Google Ads

Excluding specific audiences in Google Ads is as easy as one-two-three!

After signing into your Google Ads account:

1. Select Audiences from the left sidebar

2. Select the Exclusions tab

3. Hit the big blue  button


Voila! You’re primed to exclude audiences in Google ads. Now optimize your audience exclusions list using these options:

1. Choose to exclude from a “Campaign” or “Ad Group” using the drop-down

2. Browse for the audience you want to exclude

3. Pick between demographic, affinity, in-market, and remarketing options

4. Check the box next to an audience to exclude; select as many as you want

5. Hit Save


Difference Between Affinity Audiences and In-Market Audiences

When you search for an audience in Google Ads, you’ll notice some greyed text above each result reading either “Affinity audiences” or “In-market audiences.” Which one you choose will further refine targeting for your ads but in different ways.

Affinity Audiences

Affinity Audiences in Google Ads target potential customers to build brand awareness. These customers are likely to have a strong “affinity” for your ad since it is contextually relevant to their lifestyle, buying habits, and long term interests.

When you exclude an Affinity Audience, it is because you don’t want your ads mistakenly targeting people that might seem interested in what you’re selling, but are actually not. A great example is excluding “Soccer Fans” when your ads have something to do with American Football.

In-Market Audiences

In-Market Audiences in Google Ads target people who are actively searching or looking to buy a specific product or service like those you offer. While Affinity Audiences focus more on long-standing brand loyalty, In-Market Audiences focus on those most likely to make an immediate conversion.

Exclude an In-Market Audience to prevent your ad from making people think they can get what they want from you when they cannot. For example, if you’re selling Super Bowl tickets, you should exclude people searching for “Soccer tickets.”

How to Exclude Audiences in Facebook and Instagram Ads

There are a few ways to exclude audiences in Facebook Ads, as well as multiple layers of exclusions that can be added to your campaigns for a more nuanced targeting. For instance, you can exclude specific people who have interacted with your site when creating a custom audience, and then add additional exclusions to that audience according to their interests and behaviors when creating your ad. Below are tutorials on how to do both.

Create a Custom Audience with Exclusions

1. Sign in to Facebook Ads Manager

2. Select the hamburger dropdown menu (three horizontal lines) in the upper left corner

3. Select “Assets” and choose “Audiences.”


4. Hit the blue “Create Audience” button and start a Custom Audience

5. Choose the source for your audience (“Website” is the most commonly used)

6. Select the “Exclude People” blue link (you will need to have a pixel added to your site first if it is not already added)

7. From the dropdown choose who to exclude, such as those visiting specific pages or taken a specific action on your site

8. Finish creating the audience as normal


Exclude Audience During Ad Creation

1. In ads manager, select the green “+ Create” button to start building a new ad


2. While on the “Ad Set” section of ad creation, scroll down to “Audience”

3. Choose a relevant custom or lookalike if you have one


4. Under “Detailed Targeting” select Edit and then select “Exclude People”


5. Choose any demographics, interests, and behaviors you want to exclude

6. Finish creating your ad as normal


7 Audiences You Need to Exclude from PPC Campaigns

Now that we know how to create a negative audience, let’s identify who you don’t want to target.

Current Customers (or Everyone Else)

One of the most important steps in creating a winning ad audience is to answer one question: Do I want this ad to reach my current customers or not? If you want to say both, then your campaigns are likely not specific enough. If you answered one, then you need to exclude the other audience.

If your goal is to raise brand awareness or perform lead generation, you most likely want to exclude your current customers and leads. A great way to do this is by uploading your existing prospect and contact email lists into your ad platform.

On Google Ads, you can do this using Customer Match and setting your list as a negative audience. On Facebook Ads, you can do something similar by uploading a Customer List to create a Custom Audience. (Facebook also makes it very easy to exclude your followers as well, or target only your followers.)

If you want to target your current customers, odds are you don’t want to reach all of them. In those instances, use negative audience exclusions in Google Ads to segment your current contacts according to where they are in the sales funnel. For example, if you want to remarket to only leads who have not yet made a purchase, you can use your existing contact lists to exclude everyone else.

Current Employees

You’ve probably been in this situation before. You’re perusing the Internet or stalking people on Facebook when all of a sudden one of your company’s ads appears. It’s an exciting moment, right? Wrong.

It means you’re wasting money.

There is no reason why you should target yourself or fellow team members in a paid media campaign. To prevent this from happening, add yourselves as a negative audience in paid media campaigns. In the “Detailed Targeting” section of Facebook Ads use the “EXCLUDE people who match at least ONE of the following” to do this. Select Demographics>Work>Employees and type in your business name. Repeat for any variations or abbreviations of the business name.

On LinkedIn, excluding current employees is particularly easy as you can stop targeting specific companies (like your own) and their employees.

Although not foolproof, building a negative audience around current employees can help cut back on false-positive results. But if by chance an ad does slip through the cracks, remember, no matter how tempting it may be: DO NOT CLICK YOUR OWN ADS.

Job Seekers

Job Seekers are one of the most notorious audiences to muddle up campaign performance, especially in industries like home and health care. Job seekers are looking to convert you, not the other way around. Most likely, they care more about applying to an open position, then making a purchase or signing up for a service. So don’t waste your spend on targeting them.

Reduce job seeker inquiries in your paid media campaigns by excluding searches and interests related to “job,” “careers,” or specific job titles. Google Ads has an In-Market Audience especially for employment that you should exclude. Other, more involved, methods would be to exclude people who visit the job opportunity web page on your site, or if you link to third-party job sites and track which of your visitors are also interested in those.

Of course, if the purpose of your ad is to hire people (which is common on LinkedIn), you may want to reverse the process and exclude non-job seekers from your audience.

App Audiences

If your business offers an app, it is important to understand when and how your app audience is using your site. A lot of times, companies fail to cross-reference app analytics with site analytics (you can set up both within Google Analytics) to ensure they are not mistakenly targeting people who have already downloaded an app.

Like with any tracking, you can also segment by app actions. So if your paid media campaign goal is to convert freemium app users into premium app users, exclude all users who have already upgraded to a paid account.

Non-Engaged Visitors

Remember the movie Minority Report where Tom Cruise uses futuristic psychic sci-fi technology to locate crimes before they happen? Well, you don’t need to wait for the future to take advantage of that tech for your business. Event tracking is an incredibly powerful tool in Google Analytics, that, when paired with Google Tag Manager, can predict the future by monitoring user intent, just like Tom Cruise.

Scroll Depth trigger measures how users engage with your site by tracking how far they scroll down or across your pages. Set up this trigger in Google Tag Manager and record it as an event in Google Analytics. Then go to “Audience Builder > Conditions” in Google Analytics to create an audience around this event. In your remarketing campaigns, exclude anyone from this audience who didn’t move much around your pages —  they probably do not intend to buy what you’re selling.

You can use the Element Visibility trigger to a similar effect.

Overlapping Audiences

If you run a lot of paid media campaigns, chances are your ads will sometimes reach the same people. While ad overlap may be okay in some instances, most times doing so is counterproductive and a waste of ad spend. A perfect example occurs when performing a retargeting campaign for a specific group of people who you don’t want to see all your non-retargeted campaigns – diluting the effectiveness of your messaging.

On Facebook, one way to ensure this doesn’t happen is by creating a custom audience that excludes those who visited your site within a certain timeframe, say 60 days. You could also create an ad that excludes specific retargeting audience that you previously built as custom audiences.

In Google Ads, you can exclude retargeted audiences by utilizing the “Remarketing and similar audiences” option.

Convertors

Exclude converters wherever it makes sense to do so. This doesn’t apply to just customers, but anyone who has performed a conversion-related action who you don’t need to see your ad anymore.

This is very common in multi-stage sales funnels, where you have several micro-conversions (like a form fill or account creation) that lead to a bigger macro conversion (like a purchase or download). In such cases, you will want to exclude convertors at the top of that funnel from any remarketing efforts focusing on macro conversions, and you’ll want to exclude any convertors towards the bottle of the funnel from your initial lead generation and awareness campaigns.

Google Ads provides the ability to easily select “All Convertors” when building audiences. However, you will likely only want to exclude specific conversion sets. Event and goal tracking in both Facebook Ads and Google Ads make this very easy, where you can cherry-pick which convertors you want to exclude from targeting in your PPC campaigns.

Get Creative with Negative Audiences

The possibilities for negative audiences are almost endless. There’s always some way to refine your ad targeting further. The examples we listed above are some key audience exclusions you can implement in your Google Ads right now. But they aren’t the only ones. In fact, the best negative audiences will be specific to your business and industry and are ones only you can find after testing and analysis.

If you’re having trouble figuring out what those are, get creative and try blocking audiences that might not seem obvious at first.

Facebook’s interest-based audiences are a cornucopia for creatively building negative audiences. For example, if you are selling a high-end product or want to avoid penny pinchers, try excluding people interested in “free” stuff, or those that are members of cheap deal-hunting groups. If you’re an online site and don’t deal in cash, try excluding those who shop with “primarily cash.” Exclude “hometown” or “current resident” if you want to target tourists.

Trust us, once you start down the road of negative audience brainstorming you’ll snowball into a wealth of possibilities.